Blockchain Explorer Tutorial: A Practical Guide

You've just finished your first Cascoin block. The reward appears in your wallet, but you want more than a balance change. You want to confirm the block exists, identify the coinbase transaction, verify the output address, and establish that the reward really landed on-chain.
That's where a blockchain explorer becomes useful. Casplorer turns the Cascoin ledger into searchable pages for blocks, transactions, addresses, network activity, and Labyrinth Mining rewards. This blockchain explorer tutorial focuses on the fields that matter during a real investigation, including filters, reward tracing, confirmation depth, and the API endpoints an auditor or developer would call.
Table of Contents
- Why Use a Blockchain Explorer and What Casplorer Shows You
- Navigating Casplorer and Reading the Dashboard
- Searching Blocks, Transactions, and Addresses
- Tracing Labyrinth Mining Rewards and Mining Activity
- Using Filters and the Casplorer API
- Troubleshooting Common Explorer Mistakes
- Putting It All Together and Where to Go Next
Why Use a Blockchain Explorer and What Casplorer Shows You
A blockchain explorer is a read-only interface over node data. It takes records that would otherwise require raw RPC responses or ledger inspection and presents them as searchable block, transaction, and address pages. You can investigate public data without entering a private key, connecting a wallet, or operating a full node.
That distinction matters after a mining event. A light wallet may show that your balance increased, while a node command-line tool can expose raw details but requires technical setup and familiarity with RPC responses. Casplorer sits between those experiences. It lets a miner, auditor, or developer inspect the same public history through structured pages and links.
For Cascoin, Casplorer indexes the network's core objects:
- Blocks, including height, hash, timing, proof-of-work fields, and transaction lists.
- Transactions, including inputs, outputs, fees, scripts, and confirmation state.
- Addresses, including balances, received and sent activity, and related transaction history.
- Labyrinth Mining data, including the reward transaction created when a miner solves a block.
A miner can ask, “Did my reward reach the address I claimed?” An auditor can ask, “Which block created these funds, and where did they go afterward?” A developer can ask, “Why is this transaction absent from the expected block or still waiting in the mempool?” Those are different questions, but each begins with a searchable on-chain entity.
For a broader introduction to the underlying concept, see this guide to what a blockchain explorer does. The practical method is straightforward: identify the right object, read its fields in context, then follow linked records instead of trusting a single summary value.

Navigating Casplorer and Reading the Dashboard
Start on Casplorer's home screen and locate the search bar. This is the fastest route to a block height, block hash, transaction ID, or Cascoin address. Paste the complete identifier when possible. Partial searches can be useful, but they're easier to misread when similar strings appear.
Below the search area, the live ticker row gives you a quick view of network conditions. Read each field as a different signal:
- Block height identifies the latest known position in the chain.
- Last block time indicates when the most recent block was recorded.
- Network hashrate represents aggregate proof-of-work activity reported by the explorer.
- Difficulty describes how demanding the current mining target is.
- Cascoin price is market context, not ledger data. It doesn't prove that a transaction settled.
Clicking the current block height should take you to the latest block page. From there, inspect the block's timestamp, transaction count, previous hash, and reward transaction. Hover over unfamiliar labels and icons. Casplorer's tooltips often provide the short definition you need, especially for mining-specific fields.
The main navigation separates investigations by object:
- Blocks is useful for chronological chain review, block timing, and mining activity.
- Transactions helps locate transfers, fees, inputs, outputs, and confirmation state.
- Addresses provides balance history and the transactions associated with an address.
- Mempool shows transactions that have been seen but aren't yet included in a confirmed block.
- Labyrinth Mining focuses on Cascoin's proof-of-work and reward-related information.

Read live fields without overtrusting them
Casplorer's height display refreshes automatically, but the refresh interval can make the interface appear briefly behind the node network. Don't treat a stale-looking ticker as proof that the chain has stopped. Open the latest block and compare its timestamp and parent hash with neighboring blocks.
Orphaned or reorged blocks require similar care. A block can appear during a short-lived chain branch and later lose its canonical position. If the explorer marks a block as orphaned or reorged, don't use its coinbase output as settled provenance without checking the replacement chain.
Look for the node software version banner in the explorer's status or network information area. That version can explain differences in field rendering or indexing behavior when you're comparing Casplorer with a local node.
After viewing the dashboard once, test yourself. The height should tell you where the chain is. The last block time should tell you when that position was observed. Hashrate and difficulty describe mining conditions, while the price ticker belongs to market context. Confirmations then act as a depth counter, increasing as later blocks build on the transaction's block.
Searching Blocks, Transactions, and Addresses
Casplorer becomes most useful when you stop treating a result page as a receipt and start reading its linked structure. A block points to transactions. A transaction points to inputs and outputs. An address page aggregates the history of outputs associated with that address.
Begin with a block
Paste a block height or block hash into the search bar. On the result page, read the identity fields first:
- Height places the block in chain order.
- Hash identifies the exact block.
- Timestamp records the block's stated time.
- Merkle root commits to the transactions included in that block.
- Previous hash links the block to its parent.
- Difficulty describes the proof-of-work target in effect for that block.
- Nonce is part of the proof-of-work search.
- Number of transactions tells you how many transaction records the block contains.
For miners, the most important row is usually the coinbase transaction, commonly shown at the beginning of the transaction list. Its output identifies where the block reward and included fees were assigned. Don't infer payment from the block header alone. Follow the coinbase transaction and inspect its output script.
Decode a transaction
Paste the transaction ID, or TXID, into Casplorer. A confirmed transaction page should expose the transaction's inputs, outputs, value, fee, block placement, and confirmations.
Inputs show which previous unspent outputs funded the transaction. Outputs show where new unspent outputs were created. The fee is the difference between the value consumed by inputs and the value assigned to outputs. Confirmations show how far the transaction sits beneath later blocks.
Script fields can look hostile at first. ScriptSig carries the data needed to satisfy an input, while operation codes describe how the node evaluates the spending conditions. You don't need to decode every opcode for an ordinary payment, but you should inspect scripts when an address display looks inconsistent or when you're auditing a special transaction type.
Inspect an address
An address page normally presents a running balance, total received, total sent, and a paginated transaction list. Treat the balance as the current result of all unspent outputs, not as a complete explanation of the address's history.
Change outputs are the common source of confusion. A wallet can send funds to a recipient and return the remainder to a change address controlled by the same wallet. That makes the address history look busier than the user remembers, especially when several transactions consolidate or split outputs.
Casplorer's address pages also distinguish coinbase-related rewards and support Cascoin address formats such as base58 and bech32-style representations. Still, compare the actual output script and transaction ID when the label matters.
A compact field map helps during repeated checks:
| Field | Where it appears | What it tells you |
|---|---|---|
| Height | Block and transaction pages | The transaction's chain position |
| Hash or TXID | Block and transaction pages | The record's canonical identifier |
| Merkle root | Block page | The block's transaction commitment |
| Inputs | Transaction page | Previous outputs being spent |
| Outputs | Transaction and address pages | New destinations and unspent values |
| Fee | Transaction page | Value retained as the network fee |
| Confirmations | Transaction and address context | Depth beneath later blocks |
| Balance | Address page | Current unspent value associated with the address |
If you're designing a dashboard or audit interface, AI-ready UI blocks from DOM Studio can help you structure these fields clearly rather than presenting an undifferentiated wall of raw values. For the ledger model behind inputs and outputs, review this explanation of UTXOs.
Finish with a reconciliation check. Choose one transaction, add its outputs, compare the input total and fee, then open the destination address and confirm that the expected output appears in its history. If those records don't align, verify the network and canonical hash before drawing conclusions.
Tracing Labyrinth Mining Rewards and Mining Activity
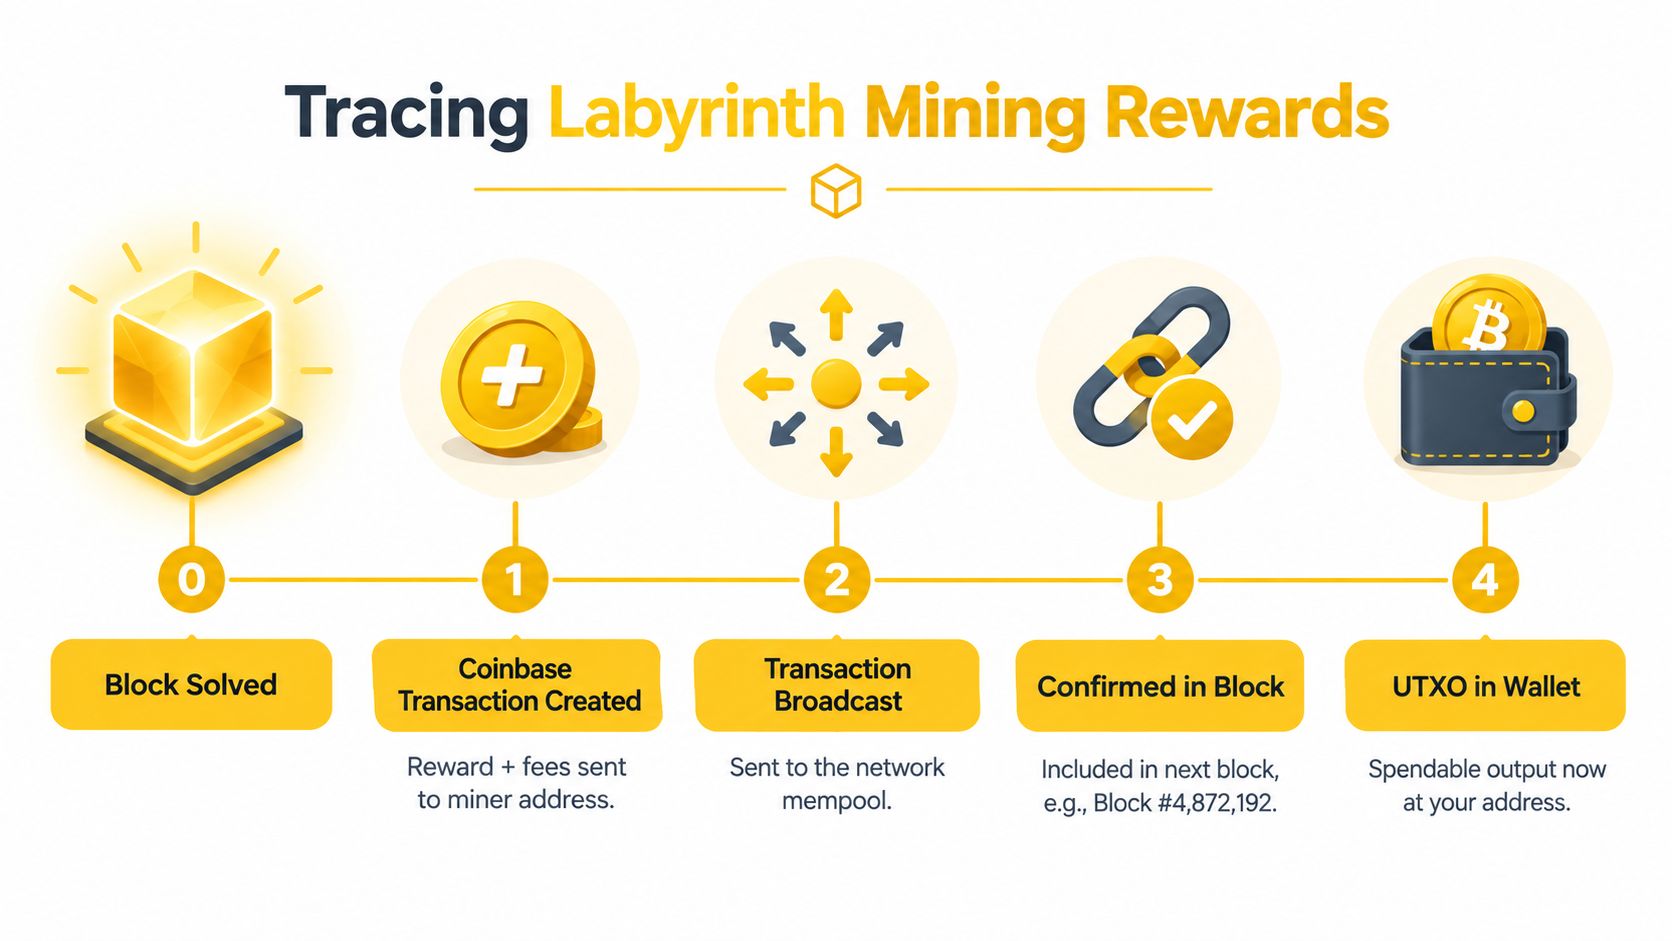
A Labyrinth Mining reward is easiest to verify by following one path, from the solved block to the wallet output. Start on the block page, not the address page. The block establishes provenance because it shows the height, hash, parent relationship, proof-of-work fields, and the transaction list created around the mining event.
Open the coinbase transaction at index 0. Its outputs contain the reward allocation and any associated fee value represented by the transaction. Look at the output script and compare it with the Cascoin address identified as the miner's destination. That match is the first meaningful proof that the reward belongs to the claimed address.
The investigation then moves forward:
- Open the block. Record the height and block hash.
- Open the coinbase transaction. Confirm that it's the first transaction and inspect its outputs.
- Match the output script. Compare the script's destination with the miner address.
- Open the address page. Check whether the reward appears in received activity.
- Follow later spending. Determine whether the output remains unspent, was split, spent, or consolidated.
The address page helps answer what happened after creation. A reward can sit untouched, move into several outputs, or merge with other mining proceeds. The transaction history won't tell you the miner's intention, but it will show the observable movement of the funds.
What deserves a closer look
Some patterns warrant investigation rather than an automatic accusation:
- Multiple coinbase payouts to one address within minutes can reflect pooled or coordinated activity, but you should compare block heights and generator details before interpreting the pattern.
- Unusually small blocks around a reward may be normal for quiet network conditions, yet neighboring blocks provide the necessary context.
- Duplicate reward hashes should be checked against the canonical block records and node data because display or indexing errors can create apparent duplicates.
A miner can perform the basic check quickly: block hash, coinbase index, output script, address receipt, and confirmation depth. An auditor should preserve those identifiers and also record neighboring blocks. The background mechanics are covered in this guide to how cryptocurrency mining works, but the explorer remains the place where the reward's public provenance is tested.
Using Filters and the Casplorer API
Casplorer's filters and API are two views of the same investigation. Use the interface while exploring an unfamiliar pattern. Move to the API when you need repeatability, pagination, or a record you can save for an audit.
The block list is the natural starting point for mining analysis. Filter by a height range to limit the search window, by generator public key to isolate a producer, or by payload hash to locate blocks carrying a specific payload. The accounts and transaction lists provide the corresponding address and transaction filters.
The relevant endpoint map is:
| UI Filter | API Endpoint | Common Use |
|---|---|---|
| Block height range | /api/blocks |
Review blocks within a defined chain window |
| Generator public key | /api/blocks |
Isolate blocks produced by one generator |
| Payload hash | /api/blocks |
Find blocks matching a payload commitment |
| Address or account | /api/accounts/{address} |
Inspect one address's balance and activity |
| Transaction list | /api/transactions |
Search or paginate transaction records |
| Transactions in a block | /api/blocks/{id}/transactions |
Reconcile a block's included transactions |
Parameter names and response shapes can change with the deployed Casplorer version, so inspect the API reference before writing a long-lived script. The same caution applies to pagination defaults and rate limits. Don't assume that an omitted page-size parameter returns every record, and don't hammer a public endpoint while testing a broad height range.
Build the audit query in layers
Start with a narrow height window and one generator key. Confirm that the response contains the expected block identifiers. Then expand the range, follow each block into /api/blocks/{id}/transactions, and identify the coinbase transaction before joining its output to an account record.
A reusable request pattern looks like this:
curl -G '' --data-urlencode 'fromHeight=START_HEIGHT' --data-urlencode 'toHeight=END_HEIGHT' --data-urlencode 'generatorPublicKey=GENERATOR_PUBLIC_KEY'
Replace the placeholders with the values used by your investigation. If the deployed API uses different parameter names, preserve the endpoint and adapt the query to the reference documentation rather than guessing.
For production audits, save the request parameters, response timestamp, block hashes, and any rejected or rate-limited requests. A UI screenshot is useful evidence for a human review, but a parameterized API query is easier to rerun and compare.
Troubleshooting Common Explorer Mistakes
A green confirmation badge isn't the same as unquestionable finality. It tells you that Casplorer currently recognizes the transaction as included in a block. It doesn't remove the need to inspect confirmation depth, the block's parent, and any reorganization warning.
An unconfirmed transaction belongs to the mempool view and hasn't yet been placed in a canonical block. A confirmed transaction has a block association, while each later block increases its confirmation depth. Treat that counter carefully. More depth generally provides stronger operational confidence, but a reorg-sensitive event still deserves a look at neighboring blocks.
Practical rule: Never prove settlement from color alone. Prove it from the canonical TXID, block association, confirmation counter, and chain context.
Address presentation creates a different class of error. Delegate accounts and ordinary wallet addresses can share recognizable prefixes, so don't classify an address from its appearance. Open the transaction type and inspect the script, account metadata, and related records.
Second-signature registration transactions can look like outgoing payments if you focus only on the amount or address movement. Vote transactions can also show a zero amount, because their purpose is registration or governance data rather than value transfer. A zero value doesn't automatically mean the transaction failed or did nothing.
When a result looks wrong, use this triage order:
- Re-query the canonical hash. Copy the full TXID or block hash instead of relying on a shortened display.
- Check the correct entity type. A block height, transaction ID, and address follow different lookup paths.
- Compare neighboring blocks. Inspect the previous hash, timestamp, and status of nearby records.
- Check node sync status. A lagging indexer can explain missing or delayed records.
- Compare raw node data. Use the Cascoin node's transaction or block RPC when the explorer omits a field.
- Document the discrepancy. Preserve the query, returned identifiers, and time of observation.
The explorer is trustworthy when its linked records agree. Escalate when the UI, API, and node disagree, or when a block is marked orphaned or reorged.
Putting It All Together and Where to Go Next
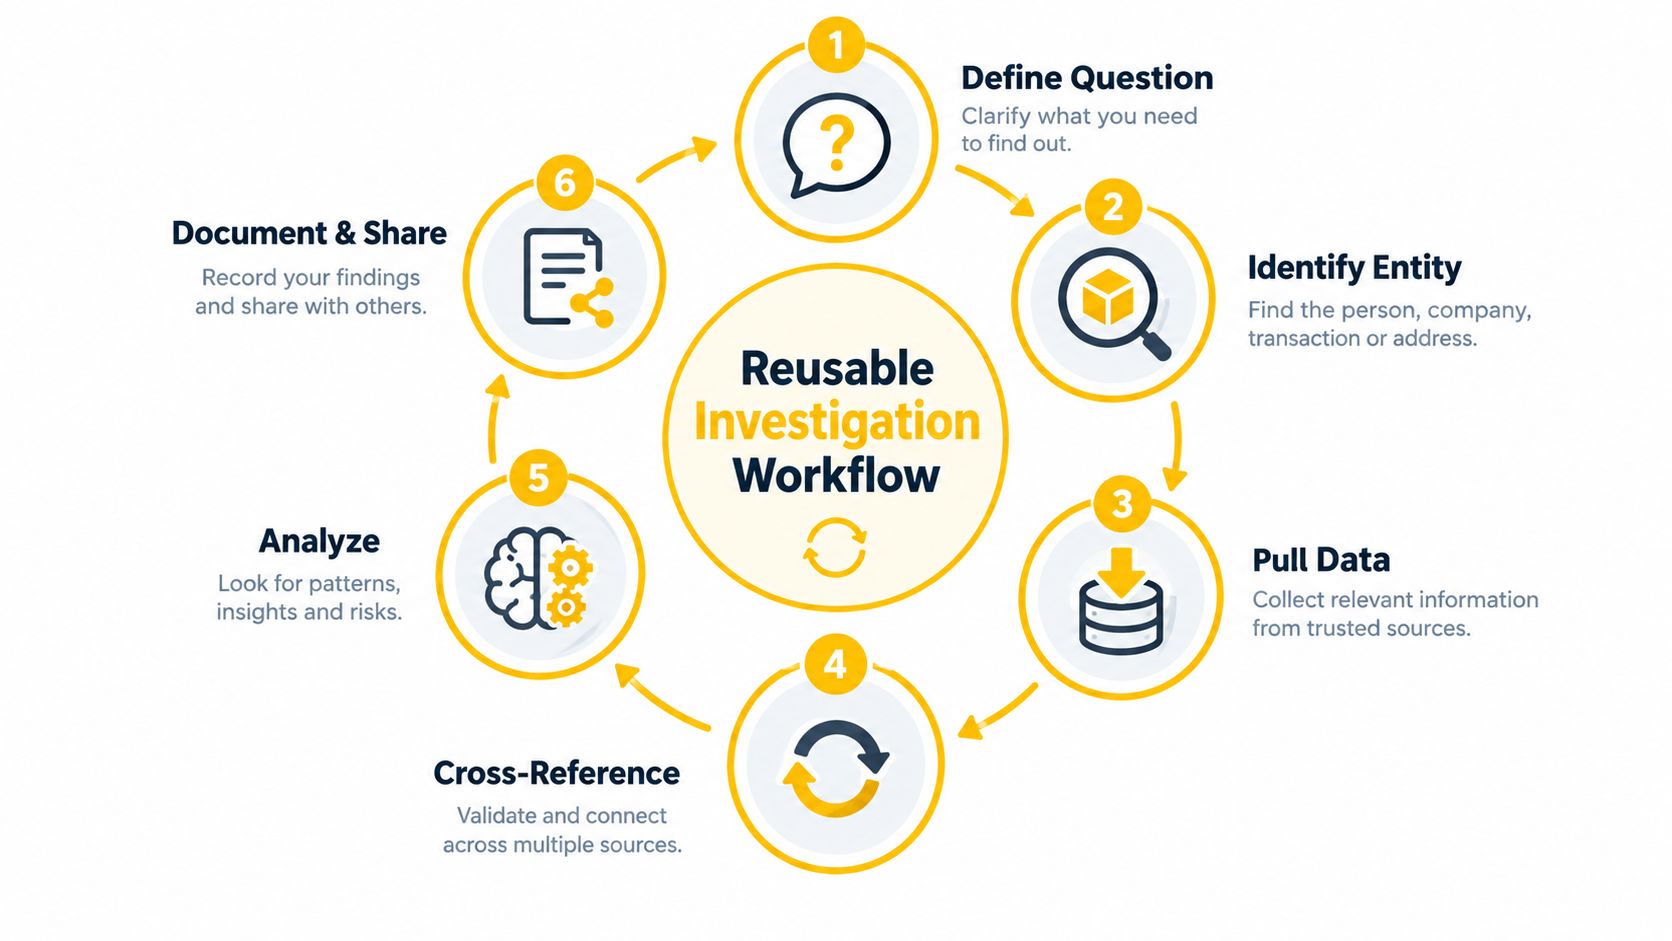
A reliable investigation is a loop, not a single search. Define the question, identify the entity, pull the data, cross-reference nearby records, document anomalies, and escalate whenever finality or indexing remains uncertain.
Apply the loop to real roles
An auditor tracing provenance should begin with the destination address or disputed output, follow it backward to the creating transaction, then continue to the coinbase or earlier funding source. Cross-reference parent and neighboring blocks, save hashes and outputs, and escalate any duplicate or orphaned record.
A developer debugging a stuck transfer should start with the canonical TXID, check whether it appears in the mempool, and inspect the input and output scripts. If the API returns no record, verify the chain endpoint and node synchronization before changing application logic.
A miner reconciling Labyrinth rewards should start from each solved block, open the coinbase transaction, match the output script to the mining address, and then follow later address activity. The audit emphasis belongs on reward provenance and whether outputs remain unspent, split, spent, or consolidated.
Bookmark Casplorer's API reference and keep a small script that polls the latest block endpoint for monitoring. If webhook notifications are available in your deployment, use them for event delivery rather than repeatedly fetching broad block ranges. When a field feels incomplete, cross-check it against the Cascoin node's getrawtransaction output and the node's synchronization state.
Cascoin combines an open-source network with Labyrinth Mining, CPU-friendly mining options, and public on-chain verification through Casplorer. Visit Cascoin to explore the network, review its documentation, and use this workflow while checking blocks, rewards, and transactions for yourself.